


A few months ago, my daughter decided it was time to “glam up” her bedroom. At first, I thought we’d go with a color theme, but her favorite color was “teal…or rainbow…or SPARKLES!!!” So we decided to go a different route and took a custom approach to a rainbow room makeover.
The first step was looking at what she already had. Her bedding and canopy tent were white with lots of splashes of color. The baskets on her bookshelves were purple and teal. Her nightstand was purple. So, a pretty blank slate to work with.
We decided, as a new reader, she should have an extra special cozy reading nook to enjoy, so we found a teal faux fur saucer chair to add underneath her hanging canopy. I remember dreaming of a papasan chair when I was younger, and this option seemed much more reasonable than the papasans I’ve seen for $200+.
DIY Rainbow Collage
Next, she announced that her walls needed a lot of “glam.” This was our chance to tie all the colors together and make a bold statement. And so began the DIY rainbow room makeover collage art project.
Supplies
- A canvas
- Printer paper
- Pencil
- Ruler
- Multi-colored scrap paper, beads, gems, pipe cleaners, pompoms, etc.
- Scissors
- Hot Glue
- Mod Podge
Step One: Make Your Template
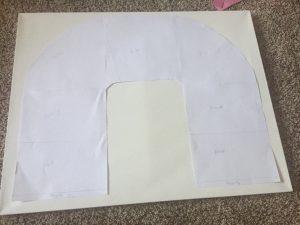 Use printer paper to create the shape of your rainbow. I purchased a 22” X 28” canvas to hang over her full size bed. Five pieces of paper, taped together, was the right amount to create the rainbow template.
From there, I measured and figured out how big each section should be. This “glam” rainbow room makeover included pink, so we needed space for seven colors. I left a little room at the bottom for clouds (aka: pearl beads).
When you’re done, place the template on the canvas to make sure you like how it looks. If not, trim, adjust, or start over until it’s what you imagined.
Note: Save this rainbow template and let your child have fun decorating it when the canvas is complete or to keep them busy while you’re hot gluing in step six.
Step Two: Trace
After I had the template aligned, I traced the inner “U” of the rainbow so I knew where my pieces of paper should start. I also marked a little dash on the canvas to show where each color changed.
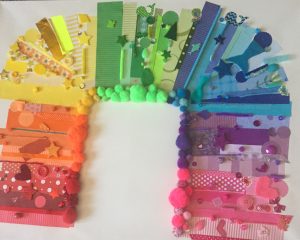
Step Three: Scavenger Hunt
 Whether your rainbow room makeover calls for the traditional rainbow colors, or you want to modify this to your own color scheme, find as many items around your house as possible in the colors you desire.
We used pieces of leftover craft paper, stickers, felt scraps, fabric, buttons, beads, plastic gems, pompoms, pipe cleaners, yarn, sequins, paper straws, and anything else we could find! This was one of the most fun steps, so make sure to include your child in the hunt. Also, it’s better to find too many things than be scrambling to find more later.
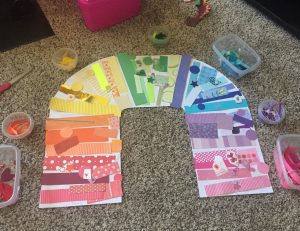
Step Four: Test Run
By now, you should have a basic outline on your canvas and the paper template. Set them side by side and do a test run with the treasures on your paper sample. I’d recommend starting with the colorful scrap paper and other flat items and adding the 3D materials at the end.
We wanted to give our rainbow a sunshine look, so we cut relatively even lengths of paper in all of the colors and fanned them out like a sun ray would look.
Note: The corner colors (yellow and blue, in ours) need a lot more stuff to cover the space since it’s on a curve.
Step Five: Make It Stick
Once you decide you like the look of your project, it’s time to get serious. We used Mod Podge to secure all of the flat items to the canvas – paper, flat stickers, even fabric. Follow the rules on your product for how to apply and how long drying will take.
Step Six: Amp It Up
 Once your Mod Podge has dried, it’s time to amp up your project and add the details. I wanted this project to be something my daughter was proud of, so I let her be as involved as possible. After she was happy with her placement of all the 3D items, it was my turn to hot glue them.
Note: This is a great time to keep your child busy by letting them decorate the paper rainbow template.
Step Seven: Tie It All Together
To finish the project together and give it a little more dimension, we decided to line the center loop with a rainbow of pompoms. My daughter had fun placing them along the pencil line we made in step two and it really tied the whole piece together.
Step Eight: Bring on the Clouds
You can’t have a rainbow without a little rain. We added “glam clouds” to the rainbow by hot glueing pearl beads. Anything could work – sequins, beads, buttons, etc.
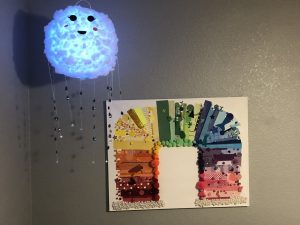
Rainbow Room Makeover
Other than the canvas, everything we used was already laying around the house, so this project cost less than $20! To me, it’s very reminiscent of the I Spy books we grew up reading. Fun for everyone!
The final touch to the rainbow room makeover was a multi-color changing DIY Cloud Light art kit. The project needed a little parental assistance and we put our Girl Scout knot tying skills to good use, but it was the perfect touch to create a cool, glam vibe in her rainbow room makeover.
Note: When you click on a link, it’ll redirect you to Amazon using an affiliate link. If you make a purchase after clicking our link, it doesn’t charge you any extra money, but it does send a little commission to Scottsdale Mom Collective as a thank you for referring traffic. This helps us bring you more great content for FREE!


")