


Well, our temps here may still feel like summer, but every store we walk into reminds us that it’s technically fall, and that the HOLIDAYS ARE ALMOST HERE! (Throwing shade at you Costco, with your glittering Christmas trees that assaulted our senses weeks ago as we walked in sweating.)
Since it’s impossible to look away from all the fall décor, you may have noticed that alternative material pumpkins are the trendy item of the season. We’ve come a long way from the bright-orange plastic pumpkins of our youth and have thankfully evolved to decorating with fun pumpkins made from all kinds of materials like fabric, wood, clay, rattan, and handcrafted metals. They can be found everywhere from the dollar stores to more upscale retailers like Pottery Barn and Crate and Barrel.
As someone who loves to craft, whenever I see cute holiday décor in stores that look like they might be easy to make myself, I jump online and search for instructions. Several years ago, I discovered just how easy it is to make your own fabric pumpkins, so I’m sharing two simple ways you can craft your own – to save money, have some fun, and to be able to tailor them exactly how you want them to look in your home.
#1 The Sleeve Method
This method is a fantastic way to repurpose an old sweater, sweatshirt, or flannel shirt, or you can hit up the thrift shops to find any of these pieces of clothing at discount prices. You can even use a long boot sock for this if that’s easier to find.
Here are the items you’ll need to gather: the garment, good scissors, some yarn or embroidery thread, a little bit of jute (bast fiber found at any craft store or Walmart), a bag of polyester fiber fill (also found at any craft store), a long needle, and a hot glue gun.
You’re simply going to cut the sleeves off the sweater or shirt, so that you have a tube of material. (Depending on what size pumpkin you want, you can get one or two from each sleeve.) Turn them inside out and gather up one end of each and tie that off with about an inch of fabric left at the end. In a pinch you can even use a big rubber band to hold the end together. Roll it back to right side out, and now you have your basic form to stuff full with the fiber fill.
When you have the shape and size you want, tie off the end, again leaving about an inch of material that will form the stem of your pumpkin. While holding that top bit of fabric tightly, wrap around and all the way up with the jute, adding some hot glue here and there, and cut off any excess fabric at the top. Using a bit of hot glue, you can cover the very top part of the “stem” so that it’s completely covered. If you’re crafting with young kids, be sure an adult is using the hot glue gun to avoid burns.
Next, you can thread your long needle with your yarn and knot the end of about 18 inches of it. Use the needle to come up through the bottom of the pumpkin and out the top, right next to the stem. Bring it down to the bottom again and repeat this step five times around, pulling slightly tight, to create the indented “seams” of the pumpkin. At the end, simply knot your yarn or thread at the bottom of your pumpkin, and you’re finished.
Here’s a great video to watch with step-by-step instructions from the Confessions of a Serial Do-it-Yourselfer blog.
#2 The Fabric Scrap Method
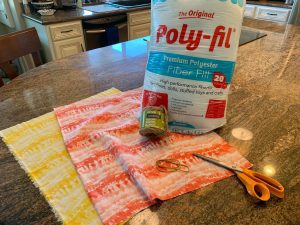 This way of making a pumpkin is basically the same, but when you use fabric, you have way more options for your design with so many great fall-patterned fabrics to choose from. I found some fun orange and yellow tie-dye looking fabric scraps at the dollar store, and simply cut rounded corners on the rectangular shaped craft fabric. Let your imagination run wild and choose any kind of fabric you love, as long as it’s thin enough to push your needle through. When you’re using fabric, after you stuff your fiber to create a roundish shape, you can simply push the fabric down in the middle with a little glue to help it hold.
When the fabric is generally tucked into the middle, grab a long piece of yarn. Place the “pumpkin” on the center of the yarn and wrap the yarn up and around. Crisscross the yarn, aim it at a diagonal and wrap it back down to the bottom. Crisscross the yarn one more time and bring it back up to the top, tying into a bow at the top. Adjust the yarn so that it divides the pumpkin into six approximately equal portions.
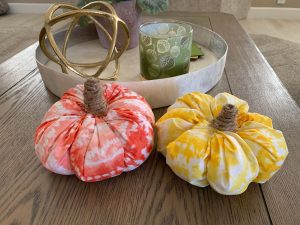 When your pumpkin is shaped how you like, tie the yarn into a knot at the top and cut off the excess. You can then tie a bow out of a ribbon or piece of twine and tuck the ribbon ends into the center of the pumpkin to finish it off. Another option is to create a stem by hot gluing a cork into the top, which can be left as is, or wrapped with jute.
For inspiration, check out these easy instructions from the Girl Inspired blog.
Happy Fall Crafting!


")