


When our daughter told us she wanted to be a “fancy pirate” for Halloween, I instantly pictured a tulle skirt, lots of pearls, and big gold earrings. For the last few Halloweens, she and I have loved creating her tutu costumes together. When my husband heard “pirate” he was imagining a DIY pirate ship, built around our Radio Flyer wagon, and decided to take this Halloween dream to the next level.
1. Find a Box
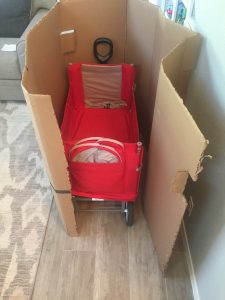 The first step in building a DIY pirate ship is finding a suitable box. My husband takes pride in knowing the best day and time to go by his favorite appliance shop to look for fresh boxes. You have to beat the recycling truck, which comes multiple times a week. Ideally, you get there when the boxes are sitting on the curb and not actually inside the dirty dumpster.
Last fall, monsoon season went particularly late. He found this oven box just as the final big storm of the year arrived. A fridge box could have worked well too, but the oven box was actually a better height for our wagon (and easier to transport home in the rain!).
2. Shape the Ship

Shaping the DIY pirate ship was the most critical step. We looked online for a photo to give us a rough idea of what it should look like.
First, we fitted the box around the wagon. Tan Duck Tape worked well to secure the edges together. More is better with this project – you don’t want your ship falling apart while you’re painting or when you’re out trick-or-treating.
The natural corners of the box made for a nice point at the front of the ship. To make painting easier, remove any stickers or labels, so you’re painting directly on the cardboard. You can also add Duck Tape to the rough upper edges to create a more finished look.
3. Test the Size
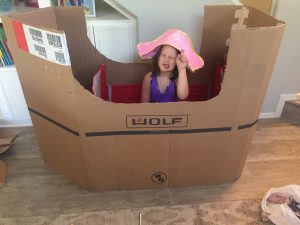
Once the box was fitted, we cut out the shape of the DIY pirate ship, making sure the sides were low enough for our daughter to peak out of when she was riding.
Attaching the ship to the wagon took some time. After trying a few different ideas, we ended up buying dowels and placing them under the wagon. The cardboard ship was able to sit on top. Caution: make sure the dowels are the right length – too short and the ship won’t be secure, too long and you’ll bump into people, landscaping, and houses. You’ll want to test your ship going over curbs before you spend any more time on this project.
4. Decorate Your DIY Pirate Ship
 Once your ship is shaped and sized, you’re ready for the fun part!
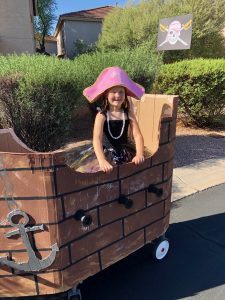
We started by painting the ship brown. Yes, the cardboard is brown, but a quick layer hid the branding on the box. We wanted the “wood” to look worn, so we let our daughter rough-brush some white paint to give it a textured look. Perfection isn’t necessary here, so let your pirates have fun!
Once the paint dried, it was time to make the plank effect. We used a cardboard scrap to cut out a template. Our daughter helped us trace these onto the ship, staggering them to look authentic. Next, we painted black lines to accentuate the planks. A q-tip with silver paint made perfect “nails” on the ends of each plank.
Our daughter had some design ideas of her own – an anchor, cannons, and a flag. We used scrap cardboard and drew an anchor. She painted it silver. The “chain” on the ship was made by her stamping a toilet paper roll into the silver paint. The cannons were made from the tulle skirt packaging and painted black. Since trick-or-treat is at night, we decided to add orange glow sticks into the cannons for a special effect. Finally, we made a pirate flag using black cardstock and printed a pirate outline. We hot glued a very thin dowel onto the back of the ship and then hot glued the flag onto the top. Painting the dowel brown let it blend into the ship. Using a thin dowel allowed it to sway slightly while we walked along.
Pulling Together a DIY Pirate Family Costume
 Our “fancy pirate” was adorable. We found a pink pirate hat in the gift shop at Sea Life Aquarium and big gold clip-on earrings at Party City. She picked a mixture of pink and sparkly gold tulle for the skirt. We included fabric with pirate crossbones to add to the pirate theme. Our “fancy pirate” strung together her pearl necklace with a bag of beads from Michaels. The leftover pearls were added to the bottom of a wooden treasure chest from Hobby Lobby, which she painted gold. Halloween was surprisingly cold, so she added some striped leggings and Anna boots to finish off the costume.
My husband and I enjoy low-key family costumes. We found a Margaritaville parrot hat on post-summer clearance for less than $3. After all, every pirate needs a parrot! I wore high leather boots and a flowy shirt that were already in my closet. Our daughter made me a long pearl necklace to accessorize my costume. Fun and festive, without breaking the bank.
The DIY pirate ship and costumes took less than ten hours and $25 to create. It was a great way to spend some quality family time, while also allowing our daughter to use her creativity to bring her costume idea to life.


")
Kelli, this is amazing! I just love it!
Comments are closed.