


If you find yourself with more Barbies than beds and a child who isn’t happy with the thought of Barbies being stored in a tub when they aren’t being played with, a DIY Barbie Bed might be the dollhouse expansion you need.
Doll Storage Options
When my daughter’s doll collection outgrew the Dreamhouse and Chelsea Camper, we started thinking of Barbie storage options.
- Barbie 3-in-1 Dream Camper Playset: My daughter was very excited about this option. It looked like there were only two or three beds in it, so this didn’t solve the problem of too many Barbies and not enough beds.
- IKEA Trofast: This has been my go-to storage solution since my daughter was a toddler. We’ve stored everything from Melissa & Doug food sets to art supplies in these wonderful drawers. My daughter was sure Barbie should have a proper bed and this option definitely didn’t meet that need.
- Box Under the Bed or Pretty Storage Trunk: While convenient and clutter free, these didn’t make the cut for the same reason as above – Barbie needs an actual bed.
- DIY Barbie Bed: I’m known for being able to fix anything with a hot glue gun, so it didn’t take long for my daughter to ask if we could make a doll bed.
DIY Barbie Bed Project
Creating a DIY Barbie bed is a pretty quick and inexpensive project. The best part is it can be easily customized to fit your child’s style preferences. We were able to gather the supplies and create three complete structures in one afternoon.
Supplies
- Sturdy Box
- Packing Tape
- Cute Paper
- Lots of Glue
- Scissors or Paper Cutter
- Ribbon – optional
Create the Structure
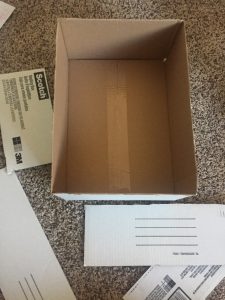
Step 1: Find a Box. Before you begin your DIY Barbie bed project, you need to find a box that’s long enough to accommodate your Barbie – most seem to be about 11.5-12″ tall.
Finding a structure can be as easy as saving the box from your next Amazon delivery. I used a Scotch Large 14″ x 10″ x 5.5″ mailing box.
Step 2: Assemble the Box. Start by cutting off four of the flaps. Be careful to cut as straight as possible; you’ll be using these later. Next, fold the four remaining flaps to assemble the box. Use packing tape to secure.
Begin Decorating your DIY Barbie Bed Structure
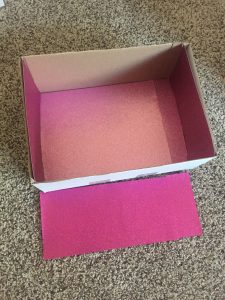
Step 3: Measure the Wall Paper. This is where the creativity comes in. Your DIY Barbie bed structure will have three interior walls and one interior ceiling. You’ll also have three exterior walls.
My daughter had a ton of fun picking out custom 12″ X 12″ scrapbook paper for this step. She decided to create three different sleeping areas: fashionista theme (pink glitter paper, naturally), mermaid theme (teal, blue, and shiny), and baby theme (trains, polka dots, etc.).
I used the box to mark where to cut the paper. Using a paper cutter will make your life much easier, but scissors will work fine too.
Step 4: Attach the Wall Paper. Once you’ve cut the paper, it’s time to glue it on the structure. Double check your measurements by setting your piece of paper where you want it to go and make any adjustments needed. I used hot glue to make sure the paper really stuck, but liquid glue or glue sticks would probably work well too.
Step 5: Finish the Edges. This is optional. If you don’t like the look of the unfinished edges, you can attach a thin ribbon around the edges. You could also finish your edges using extra paper scraps from the previous steps.
Create the Beds
 At this point, you should have a fully covered box with wallpaper on the inside and the outside. The next part of the project is to create the beds.
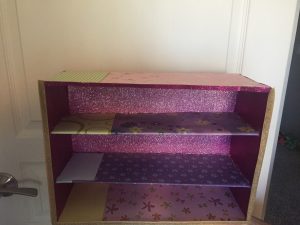
Step 6: Create the Beds. Use the flaps you set aside in step two. These will be used to make the DIY Barbie beds. Depending on which way you lay your rectangular box, you’ll be able to fit 4-6 bunk beds inside your structure.
Using the Scotch Large 14″ x 10″ x 5.5″ mailing box, we were able to fit four beds horizontally (any of the dolls fit this way) or six beds if we stood the box taller (only the Chelsea, Skipper, Stacy dolls fit this way).
Start with the easiest two beds – the top and the bottom bunks. The top bunk is the top of your box. Simple choose your “comforter” (patterned paper), measure, cut, and attach it to the top of the box. Add a paper pillow by choosing a complimenting piece of paper and attaching it. The bottom bunk is the same: choose your “comforter,” measure the bottom inside of the box, cut, and attach.
Step 7: Attach the Beds. Once your beds are “made” with comforters and pillows, it’s time to attach the beds to the structure. Lay your box flat on the ground, with the opening facing up. Space out your beds – you may want to use a Barbie to make sure there’s enough room between each section. Once you have the spacing how you like it, draw a line along the bottom of the bed where it meets the back wall of your room. Remove the bed, add glue, and attach the bunk bed. We used hot glue for this step and so far it’s held up well.
Once you’ve attached all of the bunk beds, your DIY Barbie bed is complete!


Affiliate Links
Affiliate links are used on this site. This means that when you click the link on our site (for example, an Amazon.com link) and make a purchase, we could earn a small percentage of commission for your purchase. This does not charge you any more than it would normally, it’s just a thank you from the site for referring traffic. We use affiliate links because it’s a way that we can afford to bring you great content for free. We participate in the Amazon Services LLC Associates Program, an affiliate advertising program designed to provide a means for sites to earn advertising fees by advertising and linking to amazon.com


")